First aid knowledge can make the difference between life and loss when your dog experiences an accident or sudden illness. Whether your dog steps on broken glass, ingests a toxic substance, or suffers heatstroke on a summer hike, immediate and correct action can reduce pain, prevent complications, and improve the outcome until professional veterinary care is available. This guide delivers a clear, professional roadmap for assembling a canine first aid kit, applying essential techniques, and responding to the most common emergencies—using U.S. measurements and terminology throughout. It is optimized for direct implementation on WordPress or any blogging platform.
Why Every Dog Owner Needs First Aid Skills
The Importance of Preparedness
Accidents happen even under the best supervision. A well-trained owner who knows basic first aid can:
- Reduce pain and distress
- Prevent wounds or injuries from worsening
- Avoid unnecessary complications
- Improve chances of full recovery
Rapid, calm intervention is critical when veterinary help is delayed—during road trips, outdoor adventures, or natural disasters.
Legal and Ethical Considerations
Providing prompt first aid is not a substitute for veterinary care, but in many jurisdictions pet owners have a legal duty to act in an animal’s best interest. Certified first aid skills ensure you are prepared to meet this responsibility professionally and ethically.
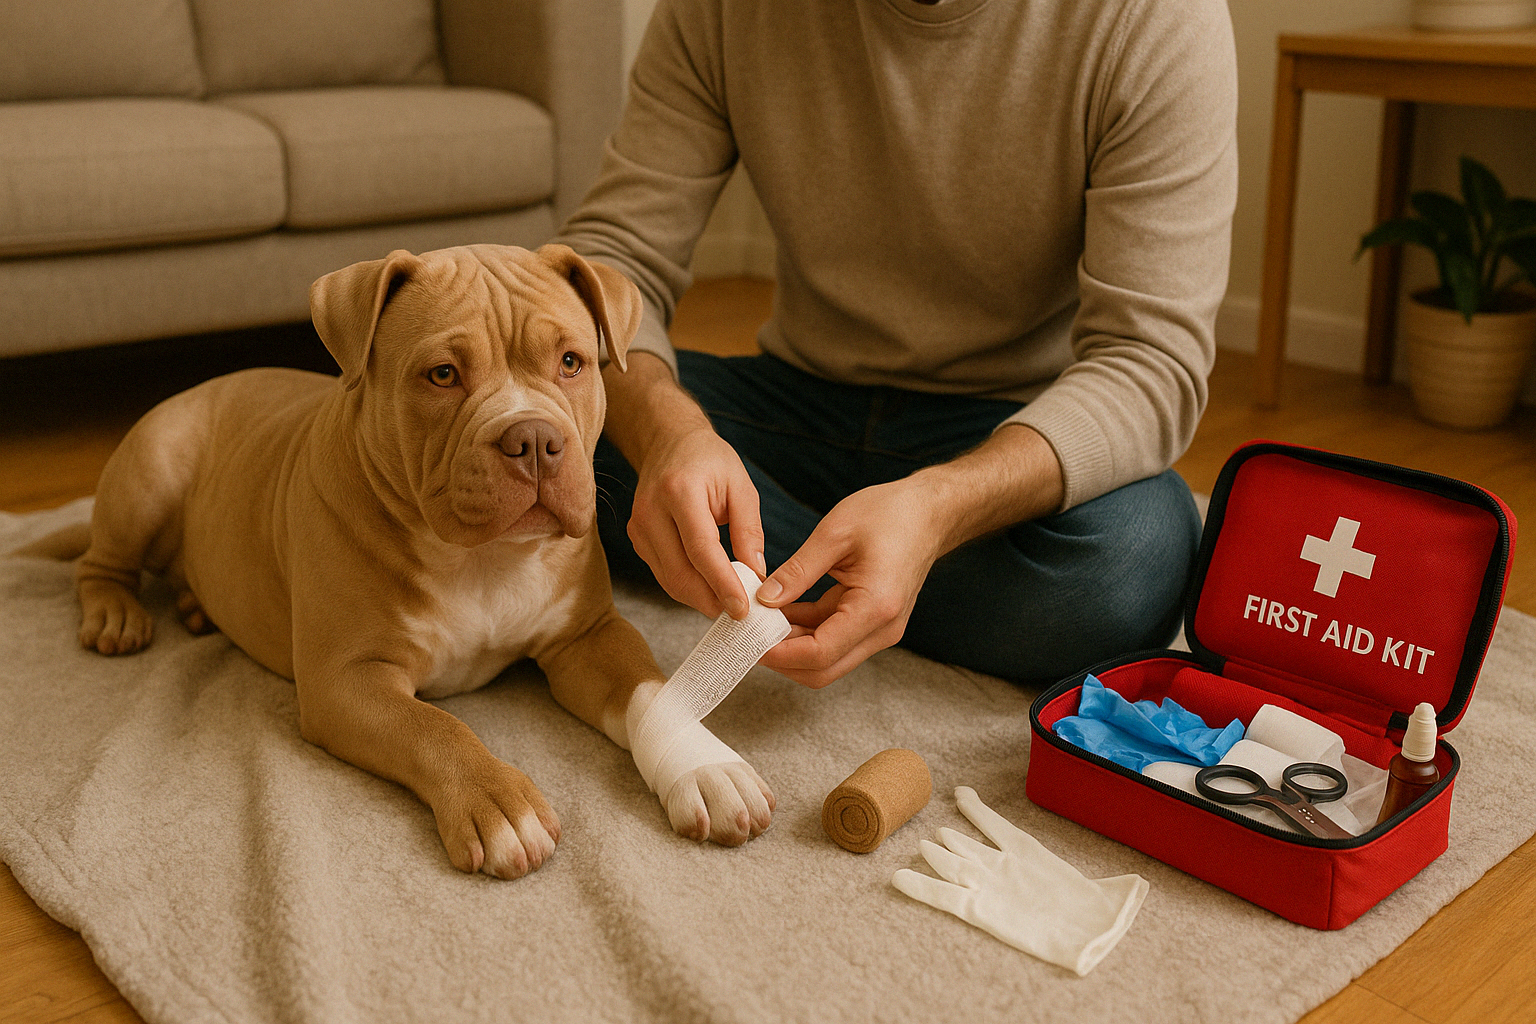
Assembling a Canine First Aid Kit
Core Kit Components
Maintain two identical kits: one at home, one in your vehicle. Inspect and refresh supplies every three months.
| Item | Specification |
|---|---|
| Gauze pads (2″×2″ and 4″×4″) | Sterile, non-stick |
| Non-stick bandages | Assorted widths |
| Medical tape (1″ width) | Hypoallergenic |
| Blunt-tip scissors | For cutting bandages and gauze |
| Tweezers | Stainless steel |
| Digital rectal thermometer | Fahrenheit reading, pet-grade preferred |
| Disposable nitrile gloves | Pack of 50 |
| Saline solution or sterile eyewash (4–8 fl oz) | For irrigating wounds and eyes |
| Antiseptic wipes or pet-safe disinfectant | Alcohol-free formulations |
| Hydrogen peroxide 3% | 1 tsp per 10 lb body weight (vet direction only) |
| Cotton balls or swabs | Pack of 100 |
| Instant cold packs (6″×8″) | Single-use |
| Styptic powder | For minor nail or surface bleeds |
| Muzzle | Soft nylon or mesh; fits your dog’s snout |
| Emergency blanket (Mylar) | One per kit |
| Flashlight | Handheld, LED |
| Vaccination records & emergency contacts | Laminated copies; include microchip info |
| ASPCA Animal Poison Control Center | 1-888-426-4435 |
| Pet Poison Helpline | 1-855-764-7661 |
Optional but Recommended Items
- Tongue depressors (for checking throat obstructions)
- Dyne® tube or high-calorie gel (for anorexic or debilitated dogs)
- Digital pulse oximeter (to assess oxygen saturation)
- Pet first aid manual or app (e.g., American Red Cross Pet First Aid)
General Principles of Canine First Aid
Ensure Personal Safety
Always assess the environment. Muzzle your dog if there is any risk of biting, especially when pain or panic may trigger defensive behavior.
Maintain a Calm Demeanor
Speak in a soothing tone and move deliberately. Your dog will mirror your energy level and remain more cooperative if you stay composed.
Follow Veterinary Instructions
Never administer human medications without explicit guidance from a veterinarian. Even common over-the-counter drugs can be toxic to dogs.
Monitor Vital Signs
Whenever possible, record your dog’s respiratory rate, heart rate, mucous membrane color, and body temperature. This data is invaluable to emergency clinicians.
Prepare for Transport
Stabilize injuries, bandage wounds snugly but not tightly, and secure your dog in a crate or with a harness and seatbelt adapter. Minimize movement to avoid aggravating fractures or spinal injuries.
Managing Common Canine Emergencies
Bleeding and Wounds
Assessment and Control
- Apply firm, direct pressure with sterile gauze for at least five minutes.
- Elevate the affected limb if no fractures are suspected.
- Secure gauze with non-stick bandage and tape.
- Use styptic powder to control minor nail or skin bleeds.
When to Seek Veterinary Care
- Bleeding continues after five minutes of pressure.
- Wound edges gape or contain foreign material.
- Signs of infection appear (swelling, heat, discharge).
Choking and Airway Obstruction
Recognition
Signs include pawing at the mouth, gagging, difficulty breathing, and blue-tinged gums.
First Aid Procedure
- Carefully open the mouth and inspect for visible objects.
- Use tweezers only if you can see and easily reach the obstruction.
- If unreachable, perform the canine Heimlich maneuver:
- For medium to large dogs: stand behind, wrap arms around the abdomen just behind the ribs, and deliver firm, upward thrusts.
- For small dogs: place on your lap on its side and compress the abdomen upward with two fingers.
- Repeat until the airway clears.
Post-Event Care
Even if the object is dislodged and breathing normalizes, contact your veterinarian to check for soft tissue injury or inhalation complications.
Poisoning and Toxin Ingestion
Common Toxins
Chocolate, grapes/raisins, xylitol, onions, medications, household cleaners, rodenticides.
Emergency Response
- Identify the substance and estimate ingestion time and quantity.
- Do not induce vomiting unless instructed by poison control.
- Call ASPCA Animal Poison Control (1-888-426-4435) or Pet Poison Helpline (1-855-764-7661) immediately.
- If directed to induce vomiting: administer 1 teaspoon of 3% hydrogen peroxide per 10 lb of body weight, orally.
Heatstroke
Symptoms
Excessive panting, drooling, weakness, vomiting, collapse, rectal temperature above 104 °F.
Cooling Techniques
- Move to a shaded, breezy area or air-conditioned space.
- Apply lukewarm (not ice-cold) water to the belly, paws, and groin.
- Offer small sips of cool water.
- Use fans or cold packs on major blood vessels (neck, armpits).
- Seek veterinary care immediately; organ damage may occur even after apparent recovery.
Fractures and Sprains
Identification
Limping, refusal to bear weight, visible deformity, swelling.
Stabilization
- Muzzle the dog to prevent defensive biting.
- Support the injured limb with a towel or blanket as a temporary sling.
- Avoid manipulating or realigning bones.
- Transport promptly for radiographs and professional treatment.
Eye Injuries
Immediate Steps
- Rinse gently with sterile saline or eyewash.
- Prevent rubbing—apply an Elizabethan collar if available.
- Obtain same-day veterinary examination; eye injuries can deteriorate rapidly.
Seizures
In-Episode Management
- Clear the area of objects that might injure your dog.
- Do not restrain or insert objects into the mouth.
- Time the seizure duration.
Post-Episode Care
- Keep your dog warm and quiet.
- Offer a calm environment until fully alert.
- Seek immediate veterinary attention if the seizure lasts longer than two minutes or if multiple episodes occur within 24 hours.
Insect Bites and Stings
Treatment
- Remove stingers by gently scraping with a flat edge (credit card).
- Apply an instant cold pack to reduce swelling.
- Monitor for signs of anaphylaxis (facial swelling, vomiting, difficulty breathing).
- Transport to an emergency clinic if allergic reactions develop.
Vomiting and Diarrhea
Home Management
- Withhold food for 12–24 hours; provide fresh water.
- Reintroduce a bland diet: ½ cup cooked white rice mixed with ⅓ cup boiled, unseasoned chicken every 4–6 hours.
When to Consult a Vet
- Persistence beyond 24 hours.
- Presence of blood, severe lethargy, or dehydration.
- Repeated episodes more than twice in one day.
When to Seek Emergency Veterinary Care
Immediate veterinary evaluation is warranted if your dog:
- Bleeds heavily or has deep wounds
- Cannot breathe or collapses
- Seizes for more than two minutes
- Ingests a known toxin
- Is hit by a vehicle, even if asymptomatic
- Becomes unconscious or unresponsive
- Shows rapid facial or throat swelling
- Exhibits bloody vomiting or diarrhea
Delay can worsen outcomes; treat every urgent sign as life-threatening.
Preparing for Natural Disasters
Disaster Planning Steps
- Assemble a “go bag” with at least three days’ worth of food, water, medications, and vaccination records.
- Keep a sturdy, escape-proof crate or carrier ready.
- Identify pet-friendly shelters, hotels, and evacuation routes.
- Ensure microchip registration and ID tags are current.
- Practice rapid loading drills so your dog becomes accustomed to entering the carrier calmly.
Enrolling in a Pet First Aid Course
Recommended Programs
- American Red Cross Pet First Aid (mobile app and in-class)
- PetTech certified courses
- Community college or veterinary school workshops
Course Benefits
- Hands-on CPR and rescue breathing techniques
- Wound care and bandaging practice
- Fracture immobilization drills
- Poisoning response simulations
Professional training boosts confidence and ensures correct application of life-saving skills.
Conclusion
Comprehensive canine first aid is not a substitute for veterinary care but serves as a vital bridge in emergencies. By assembling a well-stocked first aid kit, mastering core techniques, and maintaining a calm, decisive approach, you empower yourself to protect your dog’s health and well-being in critical moments. Share this guide with fellow dog owners and consider professional first aid certification to ensure you and your pet are always prepared.